Real Assistants in an Online World

Welcome!

Taking Care of Your Business Like It’s Our Own

Gone are the days of doing everything yourself. Sure, in the beginning of your business it appeared to make sense and save you money. But now your business is growing, you’re proven & successful in your industry, yet you find yourself up against a wall.

Your family will revolt if you work any more hours. You’re losing sleep. You’re missing important appointments and deadlines. You’re missing new opportunities. You need a clone (or perhaps just an assistant!). Sound familiar?


It’s time to REFOCUS.
It’s time to get back to doing what you LOVE.
It’s time to concentrate on your UNIQUE SKILLS.
It’s time to RECONNECT with why you started your business.

The good news is…We can help! We know the world of online or virtual assistance can be overwhelming, let us help guide your way.

Virtual Assistant vs. Online Business Manager

Virtual Assistant (VA): “Virtual assistants are independent contractors who (from a remote location, usually their home or office) support multiple clients in a variety of industries by providing administrative, creative, and technical services.” (www.ivaa.org)

Online Business Manager (OBM): “A virtually based support professional who manages online based businesses, including the day-to-day management of projects, operations, team members and metrics.” (www.obmconnect.com)

The difference?

A VA does the work.

An OBM manages the work and coaches the business owner.


Which do you need? Often, businesses start out with a Virtual Assistant and bring in an Online Business Manager as their business and team starts to really grow. As you build your team, you’ll find that it may include one or more VAs, a bookkeeper, a copywriter, a web designer, a social media specialist and more. An Online Business Manager will oversee this team in addition to taking on the day-to-day management of your business, organizing and streamlining your processes & marketing efforts and ensuring your business is headed towards your vision.

How is Creative Assistants different? We combine Virtual Assistance and Online Business Management under 1 virtual roof. In addition to OBM services, we bring along our experienced and established team of VAs. This frees you from the time needed to find and vet VAs and other service providers, and means you only have 1 check to write each month (instead of 1 check to each member of your team). Not ready for an OBM? Start with one of our affordable VA retainer packages and our OBM will be ready when you are!


Ready to get started? Schedule your free 30 minute consultation now!


Recent Posts

Setting up Your Business on Facebook – the Right Way

Many small businesses have discovered the benefits of using Facebook to connect with their customers. Yet many of these same businesses have made a critical error in setting up their Facebook presence and as a result, run the risk of their presence being shut down for violating Facebook’s Terms of Service.

What is this common mistake? Setting up your business as a Profile instead of a Page or a Group. There are 2 easy ways to check:

  1. Do you have to log out of your personal profile and then log back in under your business email?
  2. When a non-friend or non-fan visits your Facebook profile or page, do they see an “Add Friend” button?

If either of these is true for your business presence on Facebook, then you are likely in violation of Facebook’s Terms of Service and are not taking full advantage of having your business on this popular social media platform. Facebook is set up for a Profile (where you have a unique login/password and can have “Friends”) to be used by actual people only. So a brand such as “Creative Assistants” cannot have a Profile.

So what should we do instead? Create a business Page (https://www.facebook.com/pages/create.php). This Page is totally separate from your personal profile and your personal profile is set as an “Administrator” for that Page (you can name other admins too). You do not have to friend everyone who wants to connect to your business (a huge plus for those of us who post personal info on our Profiles!). You will not run into friend limits if your brand is popular. You will have more opportunities for marketing, advertising, and customization of your Page.

It’s a common mistake, but one that can be remedied – the earlier the better!

Vote for me – Accelerate! Live scholarship

I’m so excited to be selected as one of the top 10 finalists in the Accelerate! Live scholarship contest! This is an industry conference that I’d really love to attend but will need some help getting there!

Check out all the finalists and you’ll find me at the bottom of the page (#10). There’s some quality competition (and good friends!) and I wish all the contestants good luck!

You can vote once per day so vote often. Thanks!

Accelerate! Live scholarship contestant

Adding Your Blog to Your Facebook Page

A client recently asked me how to add their blog’s RSS Feed to their Facebook Page. There are 2 main ways of doing this via applications – Notes or Networked Blogs. Instructions for both methods are below, complete with screen shots.

There are several advantages to using Networked Blog’s application over Notes including the ability to add multiple blogs, more reliable on automatic postings and pulling in pictures on your blog as the thumbnail. It may look more detailed here, but it’s not that hard – just follow the steps!

a

Adding a blog via the Networked Blog application:

  • Click on this link to go to the application page.
  • You may need to follow someone else’s blog before you can register your own (browse the topics & find one to follow).
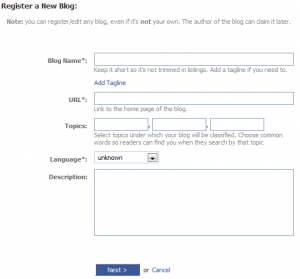
  • Click the button at the top “Register a Blog”.

    • Enter info about your blog (or the blog you want your friends/fans to see). The “Blog Name” is what your friends/fans will see prior to each post. It should be descriptive but not too long.
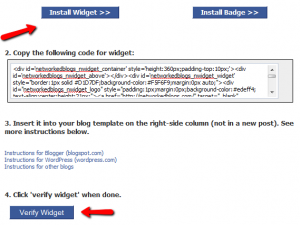
    • Click Next and then click yes to verify that you are the owner of the blog. The quickest way to verify this is to copy the code they will give you (click on “Use widget to verify ownership”) and place it in a sidebar widget of your blog. You can use any html widget to do this and can remove it from your blog once ownership is verified. Once the code is on your site, click the “Verify Widget” button on the Networked Blogs page.
  • Once this process is complete and your blog is added, you will need to set up automatic importing of your posts.
    • In the upper right corner of the application, you’ll see a link for “Syndication”. Click this and then choose your blog in the drop down box.
    • Check the box “Personal Facebook Profile” if you want blog posts to be seen on your personal wall & news feed.
    • If you are the administrator of any pages, you will see these listed. Click “Configure” for any page(s) you want the feed to appear on. You may need to click the “Install” button to add the application to that page. Then check the box “Auto-Publish blog posts to Page Wall” and you’ll be good to go!

Adding a blog via the Notes Application

  • There are 3 ways to get to the application:
    • Look for it on your tabs in your profile
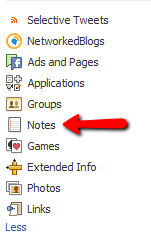
    • Look for it on the left sidebar in the applications area. You may need to click “See More” to see it listed.
    • In the search box, type “Notes” and it should come up – click on that link.
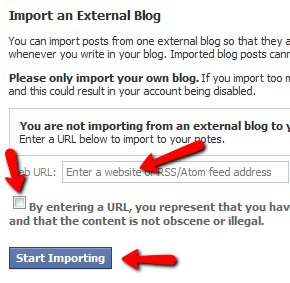
  • Once open, on the left sidebar, look for the text link that says “Edit Import Settings”
  • Enter your blog’s feed address in the box, check the agreement box and hit the “Start Importing” button. This may import *all* of your past blog posts, so just be aware. If you have a bunch then it could clog up the news feed on your Facebook wall.